pedroreinarojas.com


I present the toner and acetone method to make a PCB from home and with very simple materials.
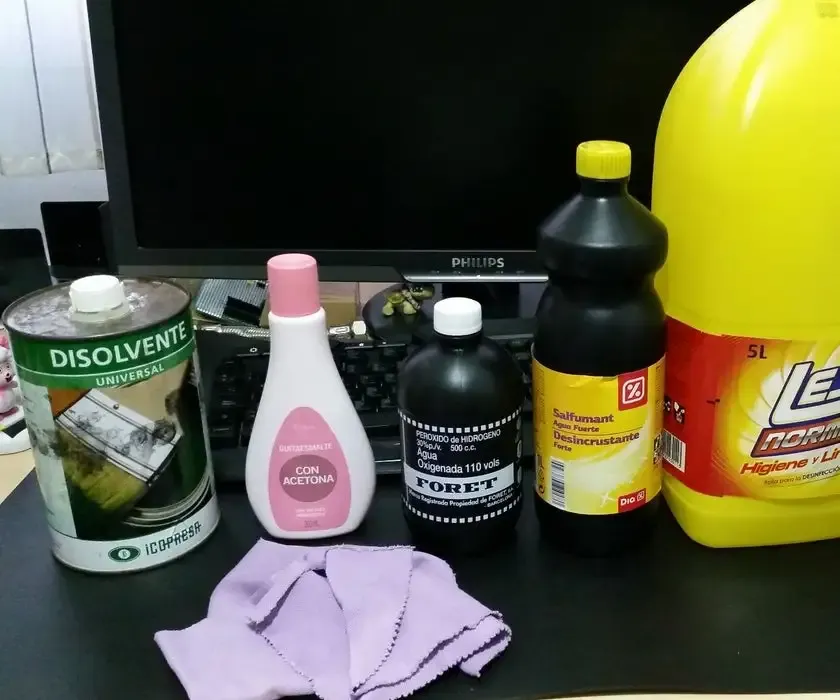
Materials:
- Steel wool, or nanax.
- Universal solvent
- Synthetic cloth (that does not leave lint or residue)
- Nail polish remover (with acetone)
- Bleach
- 110 volume hydrogen peroxide
- Hydrogen peroxide
It is really necessary to clean the PCB board.
This is done by filing a little with rock wool and then cleaning with any chemical cleaner and degreaser such as alcohol, acetone, or solvent. I recommend using the solvent.
If you don't clean your board, you may be in for a surprise when you are in the etching process, and notice that the process takes much longer than normal.
When this happens with a PCB, most of the time it is because the board contains some kind of impurity or layer of something.
So your method will fail miserably because the toner has a clean resistance under this chemical cocktail.
This is done to remove stains and embedded things.
As they say "to remove the fat"
Also, copper tends to darken and become ugly over time.
So if your PCB has been stored for a while, you will see that with the rock wool it is shiny as if it were a new board again.
Normally the rock wool takes almost everything, but there may be some greasy layer from a previous process, or the grease from your own hands.
So which we will generously give him with a paper moistened with solvent
This is more optional.
Nothing happens if you don't do it.
I like to use it in case there is any dust or cellulose left from the paper I used with the solvent.
It's a plus and it looks great
Before this step we must have the board very clean and very dry.
If there are any solvent residues, it will ruin our work. all the work, because the solvent burns the toner very quickly
With the drawing made with the printer toner, we put the drawing facing the plate, and we put it together.
That is, the paper on the plate, and the drawing in the middle, as if we were placing a tattoo on someone's skin.
The paper we will use will be normal laser printer paper, which we will have previously printed with a laser printer with the circuit drawing.
We will apply the acetone with a finger, as if our little finger were a brush.
Always making sure that the paper is flat on the plate and there are no separations.
While we wet with the acetone we make sure that the paper is well stuck to the plate, or it will create bubbles.
The acetone will start to wet the paper, and you will notice that the paper will start to stick to the plate.
Be careful at this point, because if the paper is not well placed, you will not be able to move it, because it will be stuck and probably with some of the toner already transferred to the copper of the plate.
The same if the paper moves during the process.
When we have finished "painting" the entire surface with the finger and acetone, we wait for it to dry a little until its appearance is simply more or less damp.
Then we will begin to rub gently with the same finger that we have used to "paint", in order to lift one or several layers of paper from the surface.
In this rubbing we will see the paper lift in the form of shavings and rolls, and we will see the drawing more clearly.
We must be careful and practiced not to take all the paper or tear it.
If we remove all the paper at this point, surely a large part of the toner will still be on the paper.
Using very hot water (not boiling), we pour a splash of bleach (I have never calculated a specific dose)
We leave the plate submerged, at least until the water cools.
The bleach causes the paper to come off, soften, and at the same time and for reasons unknown to me, it causes the toner to harden and stick even more to the plate.
If when removing the paper you see some stains that darken part of the toner, it means that you have used too much bleach, but it's okay, it will go away. when passing the rock wool over it.
This bleach step is using normal paper.
If you use any type of special paper, it is probably not convenient to follow this step.
Using cold or warm water and the help of your fingers, gently remove the remaining paper.
The tap water will remove much of the paper almost without rubbing.
People who use the toner and iron method, who follow this new method, will notice that in this step the paper is very loose, unlike the ironing method which requires patient rubbing.
We prepare the following proportions in a container:
- 1 part cold water
- 1 part hydrochloric acid
- 1 part hydrogen peroxide 110 volumes
And in a ventilated environment and avoiding breathing the gases that are released, we throw the plate into the preparation.
This will cause the corrosion of the copper that is not covered by toner.
If the etching leaves small areas with copper and the time is prolonged, we will remove the plate, because the excess time can corrode the tracks that are covered with toner.
If we remove the plate with some copper residue, we can do another small etching/s in an isolated and localized way, with a little paper leaving parts of the acid in those areas and waiting, or with a cotton ball we wet the acid and give small touches on the area (without dragging or rubbing).
And this is how the plate looks like:
Once the etching process is finished, we remove the toner drawing with solvent.
We can also do it with steel wool, but probably in some other process such as making the holes for the terminal pins we will also sand, so it is not advisable to fall into the vice of polishing/sanding with steel wool so as not to damage the quality of the copper.
I prefer to clean it with acetone or solvent and rubbing with paper.
We look at it against the light, if the tracks are very solid to the point that we do not see any kind of transparency, or blurring, or pores, then the copper is in perfect condition.
If we see any semi-transparent tracks, or with small dots, these tracks can cause us problems, typical problems of worn copper, poor quality tracks that can cause conductivity problems, even problems with the soldering.
This is the quality of the product.
One track above and one below have been a little degraded, but because it was a job in a hurry and with very little care, because I was recording it with video.
Normally it comes out very well the first time, even with not too much care.
Other examples made with this same method:


